So, you want to make a face mask. You’ve come to the right place! Making your own face mask from scratch can seem daunting, especially if you’ve never sewed before. Which is why we’ve put together this crafty guide to show you how to make your own face mask completely from scratch, even if you’ve never made anything before. We’ll go through common sewing terminology, helpful tips, include helpful pictures and everything else you need to know to get started with your new sewing machine. If you don’t have a sewing machine, not to worry. We’ve written another instructional blog about how to make these same masks by hand!
You can find that blog post here: https://wonderfil.co.uk/blogs/blog/easy-diy-face-mask-with-filter-pocket-fitted-nose-crimp?_pos=1&_sid=794b80cca&_ss=r

If you’re a long-time user of a sewing machine, don’t worry, there’s an article for you too. You can view our face mask pattern and tutorial over here: https://wonderfil.co.uk/blogs/blog/easy-diy-face-mask-with-filter-pocket-fitted-nose-crimp?_pos=1&_sid=794b80cca&_ss=r
Let’s start by making sure you have everything you need to create this face mask. You likely already have everything you need in your house already!
Materials You’ll Need:
- 9”x 8” (22.9cm x 20.3cm) 100% Cotton Top Fabric
- 7’ x 7.5” (17.8cm x 19cm) 100% Cotton Lining Fabric
- An elastic cord for for ear loops or, We’ll show you how to create your own ties if you don’t have elastics for ear loops.
- Sewing thread. We used Designer™ 40wt polyester for the top thread as it is strong and flexible, and DecoBob™ 80wt cottonized polyester in the bobbin. Cotton sewing thread will also work just fine.
- *optional a thick plastic twist tie, or paper clip to create a nose crimp, and extra fine grit sandpaper to eliminate sharp edges.
- non-woven polypropylene fabric if you have access to it, or another piece of 100% cotton fabric for the masks filter.
- An iron, either steam or dry. Ironing, or “pressing” the fabric you’ll be stitching helps with creating smooth and even seams and eliminates the need to hold down any folds while you stitch!
Ready to get sewing? Here’s a downloadable PDF with a pattern and comprehensive instructions. You can find the PDF by clicking here!
1. Getting started


To begin, take your top and lining fabrics. Place them wrong side down, or pale side of the fabric down. Measure a half inch, or 1.3cm from the edge of the fabric and iron the edges to make sewing the hems easier. You’ll only be creating this hem on the bottom edge of the fabric.

Once the soon-to-be hems have been pressed, you’ll stitch across each hem with a ¼” or 0.65cm seam allowance.
*Seam allowance is the distance between the edge of the fabric and where the stitch is placed.
Do this on both the top and lining fabric.
TIP!
To keep your stitches from unravelling, be sure to back stitch. Do this by going forwards, backwards, and then forwards again over top of the stitch at the beginning and ends of your stitches. This will prevent the stitches from unravelling, and the need for repairing your mask later on.
2. Putting it together
Now that you have sewn the hems on both your top and lining fabric, it’s time to put them together! Place the two pieces of fabric right sides together so that the edges opposite the hems are lined up as pictured below.

Pin these pieces of fabric together so that they don’t slip around while you’re sewing, and sew across the top, again with 1/4” or 0.65cm seam allowance. Once you’ve done this, flip the fabrics over so that the wrong sides are facing each other and Iron so that they lay flat. Putting the fabric right sides together is done so that later you can turn this inside out and hide all of the seams!
TIP!
Needing some clarification on what the “right side” and “wrong side” of the fabric are?

The “Right side” of the fabric usually refers to the most vibrant side of the fabric, and the “wrong side” is the pale side of the fabric. A good way to remember this is to think of a shirt. If you put a shirt on inside-out, that’s the wrong side. Then when you flip It and put it on right side out, that’s the “right side”!
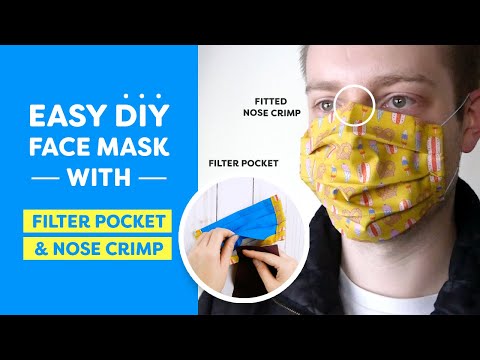
3. Nose Crimp Time! -optional-
Though having a nose crimp is optional, it’s a great feature to have on your mask to ensure that you have a tight seal around your nose. Though a good nose crimp is hard to come by, we have some easy to find materials that make great nose crimps!

Plastic twist ties from the grocery store are our favourite nose-crimp material. If you’re going to be using this option, be sure that the white material surrounding the metal piece is plastic and not paper, otherwise you’ll have a goopy paper mess in the nose crimp pocket of your mask. Can’t find the plastic twist ties at your local grocery store? You can also trim the tie off the top of any coffee bag to use!
Paper Clips can also be used as a nose crimp! Unfold the paper clip into a flat piece, trim to size and sand down the sharp ends (or use a plastic-coated paper clip.) to avoid the ends poking through the fabric or becoming uncomfortable. Pipe cleaners are another good option, as they are soft enough to use on the delicate skin of your nose, and readily available at dollar stores, the stationary isle of the grocery store, or a craft store!

4. Wrap it up!
We’re nearly there! Fold a ½” or 1.3cm from the bottom of the fabric (opposite the nose crimp) and press. This will help hold the two pieces of fabric together while we make the pleats.

To create the pleats, fold the fabric down at least three times in an accordion fold. Hold on tight, and Iron the pleats in place.

Place a pin on either side of each pleat, and stitch along the edge, leaving a ¼” seam allowance along the lining fabrics edge.


You’ll notice the bottom of the fabric now has an opening between the top and lining fabric, this is where your filter will go!

Fold the sides over ½” or 1.3 cm and iron in place. Repeat this a second time, ironing and pinning in place to prepare for stitching.

Stitch close to the edge of the fabric closest to the lining fabric to leave space to run the ear loops through.


5. Make it wearable.
So now the mask itself is made, but how are you going to wear it?
If you have access to the soft elastics commonly seen on face masks, or any other elastic you’d find comfortable, measure two 12” strands of the elastic.

Attach a safety pin to one end of the elastic and slide the safety pin through the edge of the mask. Once it’s through the side of the mask tie the ends of the mask together tightly and slide the knot inside the mask to hide the knot. Repeat on the other side and you’re finished!


If you prefer to have the elastics, you purchase pre-cut elastic cord online through WonderFil! Each pack contains enough for five masks. https://wonderfil.co.uk/collections/accessories/products/elastic-cord-for-face-masks With every purchase of these cords WonderFil is making a donation to Direct Relief, an organization offering targeted assistance for people confronted with disasters. Currently they are working to provide protective equipment and critical medication in response to COVID-19.
Don’t have access to these elastics? No worries, here’s a quick and easy pattern to make them. These can be tied behind your head when you’re ready to wear your mask.

If you’re sewing, cut two 12” x 1” (30.5cm x 2.5cm) pieces of fabric. Fold them in half lengthwise twice and sew once down the center to secure them. Attach a safety pin to the end of the straps and run it through the side of the mask. Secure the ends behind your head when you’re ready to wear.

And there you have it! You’re first home-made mask to keep you and your loved ones safe!
Ready to get sewing? Here’s a downloadable PDF with a pattern and comprehensive instructions. You can find the PDF by clicking here!

We all know how uncomfortable our ears can get when wearing a mask all day. Why not relieve some of that pressure by making an ear guard! Head on over to our blog post on how to make an ear guard for a free pattern, and detailed instructions: https://wonderfil.co.uk/blogs/blog/simple-ear-guard-for-face-masks-tutorial?_pos=2&_sid=794b80cca&_ss=r
Or download the super easy pattern and instructions by clicking here!
We hoped this guide to mask making helped clear up any questions that new sewers may have. Are you ready to dive into the world of sewing? Why not start by picking up the best quality threads for your machine or handmade projects! You can also sign up for our free newsletter to receive more educational sewing tips, tutorials, and free patterns. Register by clicking here! We’ll see you again next time!